Why Your Off-Road Suspension Upgrade Is Holding You Back (And How to Fix It)
You dropped serious money on that suspension upgrade, expecting to dominate trails like never before. Instead, your truck feels worse than it did stock. Sound familiar? You're not alone. Despite the off-roading vehicle market expected to hit 13.5 billion USD by 2024, we see disappointed enthusiasts every day who thought they were getting the perfect setup. Your suspension system should be the foundation that handles whatever terrain you throw at it, but too many upgrades fall short of expectations.
Here's what we've learned from years of helping truck owners sort out their suspension headaches: modifications that look great on paper often create real-world problems. You expected better stability and control. Instead, you got a rougher ride and handling that makes you question every purchase decision. Quality off-road suspension does exactly what it's supposed to do—soak up big hits and give you the ground clearance you need. But when components don't work together properly, even expensive parts can make your ride worse.
Whether you're planning an f150 suspension upgrade or tacoma suspension upgrade, getting it right the first time saves you money and frustration. We've helped countless owners fix suspension problems that could have been avoided with the right approach from the start.
This guide breaks down exactly why your pickup suspension upgrades might be working against you and shows you how to fix these issues. We'll cover everything from choosing the right setup for towing versus trail riding to correcting the geometry problems that happen after installation. Your truck deserves suspension that actually improves your off-road experience, and we're here to help you get there.
Why Your Suspension Upgrade Feels Worse Off-Road
That expensive suspension upgrade should have made everything better. Instead, your truck feels like it's fighting you on every trail. This happens more often than you'd think, and we've helped enough frustrated owners to know exactly what's going wrong.
The problem isn't usually the parts themselves—it's how they work together once installed. Understanding what your suspension is actually doing (and what it's not doing) helps you spot the real issues.
Common signs of poor suspension performance
Your truck will tell you when something's wrong. After an upgrade, keep an eye out for these warning signs:
- Uneven tire wear patterns are often the first clue something's off. Check for wear on the inside or outside edges, or that scalloped pattern across the tread—your suspension geometry has probably been altered. Good suspension keeps your tires in consistent contact with the ground, wearing evenly across the entire surface.
- Handling problems show up as excessive body roll when you turn, steering that wanders and needs constant correction, or that floating feeling after you hit bumps. Your truck might also nose-dive hard when braking or squat backward during acceleration—signs your shocks aren't controlling movement properly.
- Strange noises like clunks, rattles, or squeaks during normal driving usually mean something's loose or damaged. Another red flag: if your truck bounces multiple times after hitting a bump, your suspension isn't absorbing impact energy the way it should.
How stock vs upgraded systems behave differently
Factory suspension represents a compromise. Engineers designed it to work acceptably for most drivers on mostly paved roads. That means it typically lacks the clearance and flexibility serious off-road use demands.
Quality aftermarket suspension takes a different approach. These kits are built for specific applications and vehicles, offering larger oil capacity, better valving, and improved control over suspension movement. When everything works correctly, you should get smoother rides and better stability over rough terrain.
The difference becomes obvious once you hit the trails. Stock suspension on many trucks actually gets overloaded by heavier riders, causing front forks to bottom out on potholes and rear shocks to lose proper rebound control. That's where a well-matched aftermarket setup really shines.
Why your ride feels rougher after upgrading
Here's the frustrating part: many suspension upgrades actually create a harsher ride. Several technical factors cause this:
- Altered suspension geometry happens when you lift or modify your truck without addressing all the affected components. Factory engineers established a specific ride height with carefully calculated compression and rebound damping zones. Simply adding spacers or changing spring height throws this balance completely off.
- Mismatched components cause more problems than any other single issue. Adding a spacer kit puts considerable preload on factory coil springs that were never designed to operate that way. We also see owners install heavy-rate springs on trucks that don't carry enough weight to compress them properly.
- Ball joint angles change dramatically with increased ride height. Without upgrading to control arms designed for your new suspension height, factory ball joints operate at severe angles, creating excessive stress and potentially preventing proper alignment.
- New vs. worn components feel completely different. If you're replacing very old struts, the new ones will have much higher damping rates. They absorb energy faster, creating a stiffer feel that many people mistake for poor performance.
Mismatched Components That Hurt Performance
Off-road suspension isn't just about bigger shocks and taller springs. Every component needs to work together like a well-tuned engine—when one part is out of sync, the whole system suffers. We've seen expensive aftermarket parts create more problems than they solve because owners didn't consider how everything connects. Getting beyond the basic "lift and go" mentality reveals the engineering principles that separate successful upgrades from expensive mistakes.
Over-sprung or under-damped setups
Most factory suspensions come with a frustrating combination: springs that are too stiff paired with shocks that can't handle the workload. This mismatch gets worse after modifications. When your spring rate and damping force don't match up, your truck develops that bouncy, unstable feeling that makes you wonder why you bothered upgrading.
Hit a decent bump and watch what happens—an under-damped suspension will oscillate multiple times before settling. That "boaty" sensation plaguing so many truck owners after spring upgrades? It's because they didn't upgrade the shocks to match. The technical side involves rebound valving, which controls how fast a compressed shock extends back to normal position. Factory shocks typically have weak rebound valving that can't handle the energy released when heavier springs decompress.
The problem becomes obvious when you're carrying gear. Your springs might support the weight just fine, but inadequate shocks can't stabilize it. Quality shocks can reduce the bounce cycle by about 50% in a predictable way, eliminating that second or third compression wave when weight crashes back down onto the suspension.
This balance becomes critical for folks who both tow and hit trails. A suspension upgrade for towing needs different damping characteristics than one built for trail use. Specifically, shocks handling heavier loads need enhanced rebound valving to control the extra mass during transitions from compressed to extended positions.
Incorrect shock length for lift height
Too many enthusiasts buy shock absorbers based only on advertised lift height without understanding that shock length should actually be determined by bump stop spacer length. This oversight causes real problems down the trail.
Short shocks limit suspension travel and potentially allow bottoming out. Long shocks can't compress properly, creating harsh ride quality and possibly damaging other components. This mismatch happens because lift manufacturers' claimed heights often differ from actual installed heights—a Clayton "2.5-inch" lift, for example, often measures closer to 3-3.5 inches in real applications.
Proper shock sizing means measuring full droop and compression distances rather than just matching lift kit numbers. The general rule suggests maintaining about one inch of shock shaft extended at full compression for hydraulic bump stops, though some experts prefer around half an inch. This prevents transferring impact loads directly to the chassis through the upper mount.
Using lift kits without geometry correction
Here's where things get serious. Installing lift kits without addressing the altered suspension geometry creates a cascade of problems that no shock upgrade can fix. This is probably the most expensive mistake we see.
When vehicle height increases, control arm angles change dramatically, placing ball joints at severe angles they weren't designed to handle. This creates excessive stress on joints and bushings while potentially preventing proper alignment. Without correction, these misaligned components cause accelerated wear, compromised handling, and often that distinctive "death wobble" sensation many lifted trucks experience.
Correcting these issues requires control arms specifically designed for your new ride height. Your options include:
- Billet aluminum arms with Heim joints (frame side) and uniballs (spindle side) - Excellent performance but vulnerable to salt, mud, and alignment complications
- Tubular ball joint control arms with bushing pivots - Easier alignment using factory adjusters
- Hybrid designs with bushing pivots (frame) and uniballs (spindle) - Good balance of performance and maintenance
Beyond control arms, proper geometry correction often requires differential drop brackets to maintain CV axle alignment. Without these, the CV boots operate at extreme angles, quickly leading to tears and axle failure—a surprisingly common and expensive consequence of incomplete suspension upgrades.
A proper f150 suspension upgrade or tacoma suspension upgrade requires addressing all geometry changes, not just increasing ride height. Though some shops suggest adding geometry correction "only if needed", experienced off-roaders know these components aren't optional—they're fundamental to maintaining performance, preventing premature wear, and ensuring predictable handling when conditions get challenging.
Terrain-Specific Mistakes in Suspension Setup
Getting your suspension dialed in for one type of terrain doesn't mean it'll work everywhere else. We see this mistake constantly—owners who set up their rigs for rock crawling then wonder why they're getting beat up in the desert, or vice versa. Each terrain has specific demands that require different suspension characteristics.
Rock crawling vs high-speed desert tuning
Rock crawling and desert running might both be off-roading, but they need completely different approaches. When you're picking your way through technical rock sections, articulation is everything. You want about one-third of your available travel as up-travel, which lets your wheels stay planted on uneven surfaces. Solid axle setups dominate here because they're built to take punishment and maintain traction over big obstacles.
Desert running flips this whole concept. Those trophy trucks you see flying through whoops aren't just showing off—they need massive suspension travel with two-thirds configured as up-travel to keep wheels on the ground over repetitive bumps several feet tall. These setups sacrifice cornering ability for high-speed impact absorption.
Here's a practical starting point: 6 inches of up-travel works well for speed-oriented setups, while rock crawling benefits from monotube shocks with softer settings designed to absorb sharp, jagged impacts.
Why mud and sand need more articulation
Mud and sand create their own unique challenges that catch many people off-guard. Deep mud requires a balance—your suspension needs enough firmness to prevent excessive body roll but not so much stiffness that you lose traction. Too many owners go overboard with stiff settings, which causes tires to dig in instead of floating across soft surfaces.
Sand is the opposite of what most people expect. Softer suspension setups with reduced shock damping and spring rates actually help your vehicle float on top rather than dig in. This keeps momentum going through dunes and prevents that sinking feeling that kills forward progress. Ground clearance and articulation become critical for both mud and sand since they help you avoid getting stuck.
Suspension upgrade for towing vs trail use
This is where many truck owners get frustrated trying to make one setup do everything. Towing demands enhanced rebound control to manage extra weight, while trail riding prioritizes flexibility and articulation—two characteristics that don't play well together.
Most off-road packages include monotube shocks that actually hurt towing performance. Air suspensions work great for towing but typically offer less travel for off-road use. When you're considering an f150 suspension upgrade or tacoma suspension upgrade, keep in mind that off-road packages often include performance-tuned shocks that can actually reduce your towing capacity.
The bottom line: decide what you'll be doing most and optimize for that. A compromise setup usually means you're not getting the best performance in either situation.
Fixing Geometry and Ride Quality Issues
Getting your suspension geometry right makes the difference between a truck that handles well and one that fights you on every turn. Most enthusiasts get caught up in lift height numbers and forget about the critical alignment changes that happen when you raise your truck. Fixing these issues takes a methodical approach that addresses three main areas.
Correcting caster and camber after lift
Lift your truck and your suspension geometry changes immediately, often dropping caster down to nearly zero. This kills your straight-line stability and makes the steering feel loose and wandering. Factory alignment specs weren't written for lifted trucks—what looked perfect before your lift might show serious positive camber afterward.
Here's what you need to aim for after lifting:
- Caster: 2.7 degrees or higher (yes, this puts you "out of spec")
- Camber: Get as close to zero as possible to avoid eating up tires
- Toe: Zero total toe gives you the longest tire life
Most alignment shops won't adjust beyond factory specs, so you'll need aftermarket components to get these numbers right. Skip this step and your suspension upgrade won't handle well no matter how much you spent on parts.
Upgrading control arms and track bars
Factory control arms work fine at stock height but weren't built for lifted applications. Raise your truck and those ball joints start operating at extreme angles that create stress and wear. Upgraded control arms fix these angles and keep everything aligned properly.
Your options break down like this:
- Billet aluminum arms with Heim joints (frame side) and uniballs (spindle side)—work great in dry climates
- Tubular ball joint control arms with bushing pivots—easier to align using factory adjusters
- Hybrid designs that combine bushing pivots with uniballs—good balance of performance and maintenance
Don't forget about track bars—they're the only thing keeping your axles from shifting side-to-side. Loose track bar bolts cause that infamous "death wobble", but plenty of people overlook this component when upgrading.
Using bump stops and limit straps properly
Bump stops protect your expensive components by preventing over-compression. But mount them wrong and they won't do their job. Too many people set them up to engage during normal driving instead of just at the end of travel.
Limit straps stop over-extension and need to be installed with stretching in mind. Mount them so the tabs and clevis line up properly when fully extended—this prevents side loads that can break mounting points.
Set your bump stops to engage just before your shocks bottom out, leaving about 0.5 inches of shock travel. This keeps impact loads from transferring directly to your chassis through the upper mounts.
Choosing the Right Suspension for Your Vehicle
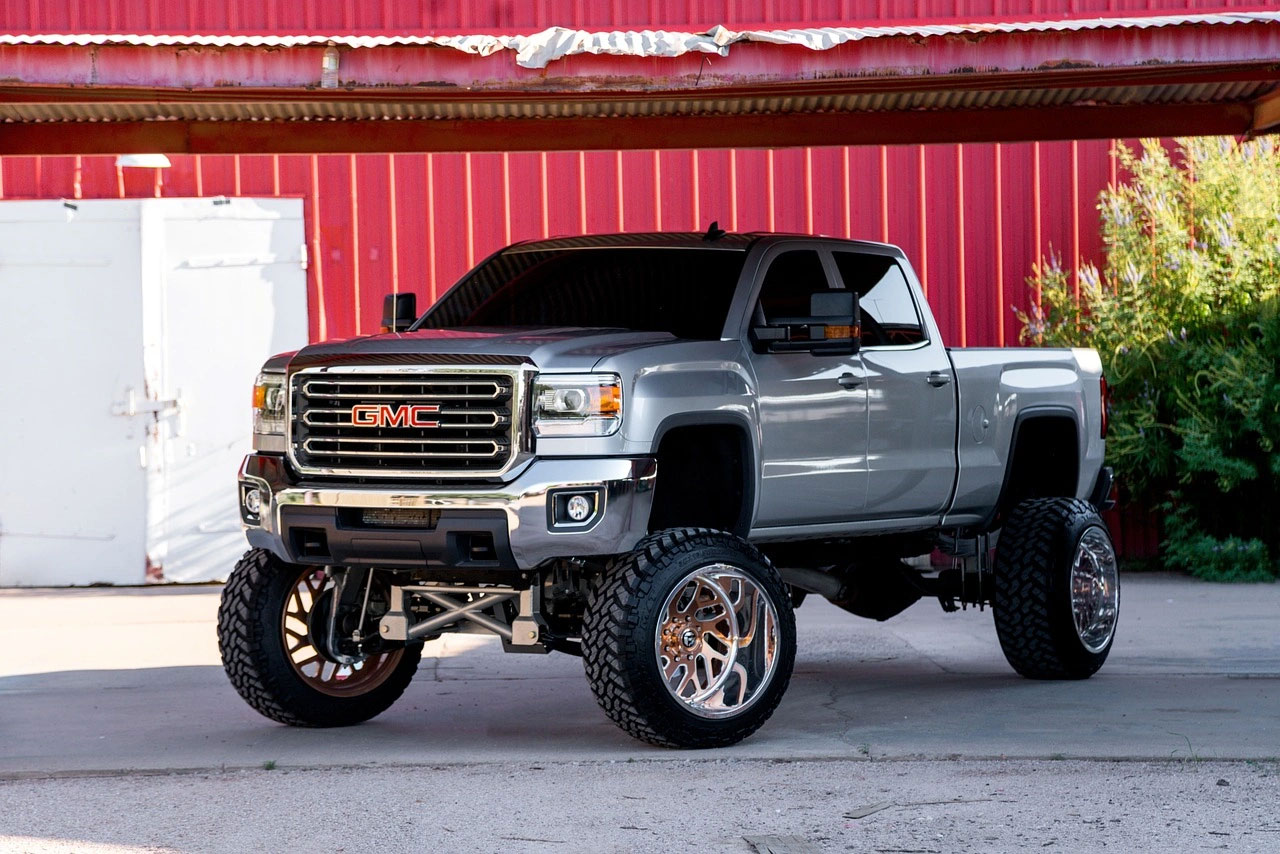
Image Source: https://pixabay.com/
Your truck isn't just another vehicle rolling off the assembly line—it has specific strengths and weaknesses that affect how suspension upgrades perform. We've learned that vehicle-specific solutions work better than universal approaches because each model presents unique challenges that generic kits simply can't address effectively.
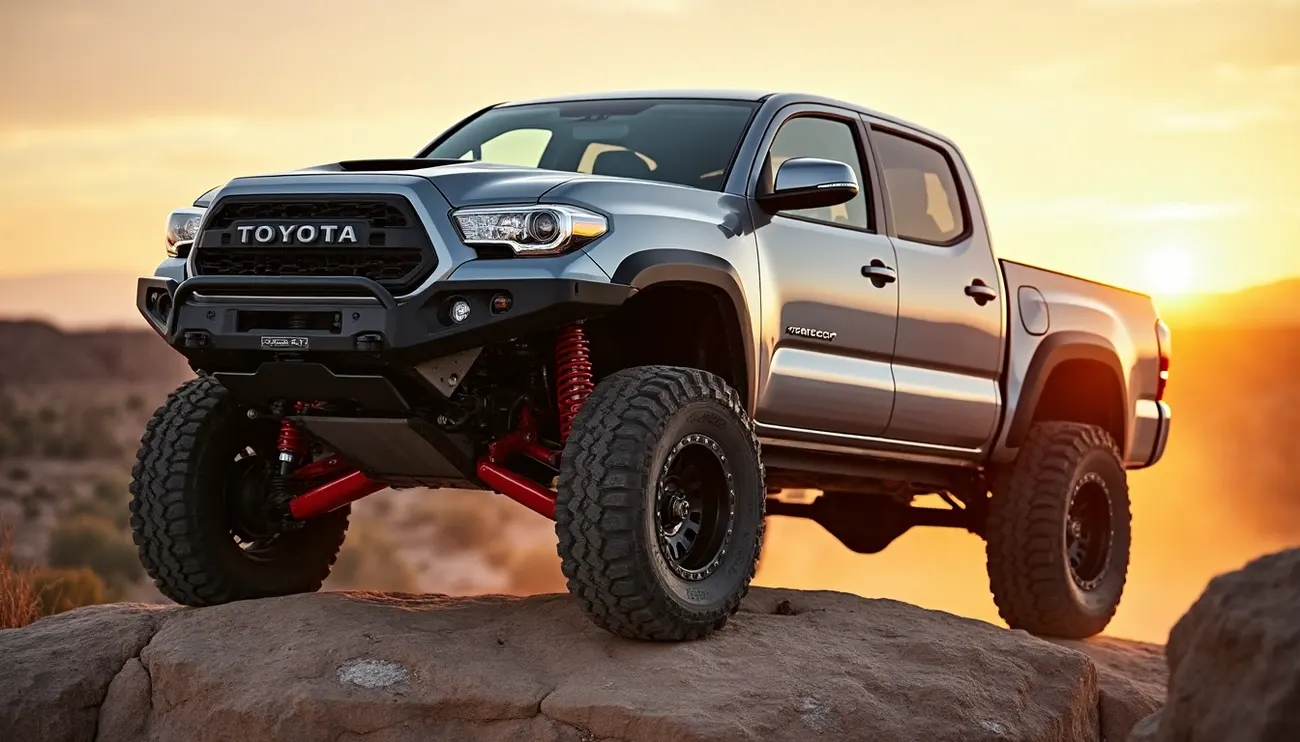
Tacoma suspension upgrade: common pitfalls
Tacoma owners often make the mistake of buying universal suspension packages without thinking about how they actually use their trucks. We see it all the time: someone loads up their Tacoma with steel bumpers, skid plates, and roof racks, then wonders why their suspension feels sluggish and sits lower than expected.
Here's the thing about Tacoma suspension—the factory setup works fine for light duty, but it's not built for serious off-road abuse. Upper control arms become the weak link once you start increasing travel or changing geometry with a lift. Upgrading these gives you better ball joint articulation, proper alignment, and the caster angles you need for stable high-speed driving.
Most Tacoma owners focus all their attention on the front end while ignoring the rear. That's backwards thinking when you consider how much gear most people haul in the bed. For most applications, a 2-3 inch lift hits the sweet spot—you get real capability improvements without the complexity and handling compromises that come with bigger lifts.
F150 suspension upgrade: what works best
F150 owners face a different decision: leveling versus lifting. Leveling kits fix that factory rake by bringing the front up 1-2.5 inches using strut spacers or replacement coilovers. Lift kits take a different approach, raising both ends for maximum ground clearance and that commanding presence.
Your component choices depend on what you're trying to accomplish. Budget-conscious owners often choose spacer leveling kits with CNC-machined aluminum or steel spacers. Want better ride control? Front coilovers give you improved damping and the ability to fine-tune your setup. Tow frequently? Air springs provide the stability you need when hauling heavy loads.
Independent vs solid axle considerations
The IFS versus solid axle debate comes down to how you actually use your truck. Solid axle suspensions link both wheels together across the vehicle. When one wheel hits an obstacle, it affects the other wheel directly.
Independent front suspension lets each wheel do its own thing when encountering obstacles. This design keeps tires in better contact with the ground, giving you more stability and smoother handling over varied terrain. IFS also provides a more comfortable ride, which matters if you spend significant time on pavement.
The reality is that solid axles dominate at low speeds during technical rock crawling but struggle at higher speeds. IFS handles better overall but gives you less wheel travel when lifted, since it can't "flex" the way solid axles do. Your choice should match your primary use case, not what looks coolest in photos.
Conclusion
Suspension upgrades can transform your off-road experience, but only when done right. We've walked through the most common problems that leave truck owners disappointed with their expensive modifications. The good news? Most of these issues have straightforward solutions once you understand what's actually happening.
The biggest mistake we see is treating suspension upgrades like a simple bolt-on modification. Your truck's suspension is a system where every component affects the others. Change one thing, and you need to consider how it impacts everything else. That's why focusing just on lift height without addressing geometry changes leads to so many problems.
Your specific truck and how you use it should drive every decision. An f150 suspension upgrade has different requirements than a tacoma suspension upgrade. What works perfectly for weekend trail riding might be terrible for daily driving and towing. We've helped enough customers through these decisions to know that one-size-fits-all solutions rarely work well.
The key is balance. Quality springs need matching shocks. Lift kits need proper geometry correction. Your suspension setup for rock crawling won't work well for high-speed desert runs. Getting these relationships right makes the difference between a suspension that enhances your off-road adventures and one that makes you question every purchase decision.
Our goal with this guide is simple: help you avoid the frustration of a suspension upgrade that doesn't deliver what you expected. Whether you're diagnosing problems with your current setup or planning your first upgrade, the principles we've covered will steer you toward a suspension system that actually improves your off-road experience.
Your truck deserves suspension that works as hard as you do on the trails. With the right approach, you can get there without the headaches and extra costs that come from learning these lessons the hard way.
Key Takeaways
Understanding why your suspension upgrade isn't performing as expected and how to fix it can transform your off-road experience from frustrating to exceptional.
• Match all components properly - Springs, shocks, and damping must work together; mismatched parts create bouncy, unstable handling regardless of individual quality.
• Correct geometry after lifting - Lifting changes critical angles throughout your suspension system, requiring upgraded control arms and proper alignment to prevent premature wear.
• Choose terrain-specific setups - Rock crawling needs articulation while desert racing requires high-speed impact absorption; one setup won't excel at both.
• Address the complete system - Focus beyond lift height to include bump stops, limit straps, and geometry correction for optimal performance and component longevity.
• Consider vehicle-specific solutions - F150 and Tacoma suspensions have unique characteristics; universal upgrades often fail to address model-specific challenges effectively.
The most expensive suspension components won't improve performance if they're not properly matched to your vehicle, terrain, and usage patterns. Success requires a holistic approach that addresses geometry, component compatibility, and terrain-specific tuning rather than simply installing the tallest lift kit available.
FAQs
Q1. Why might my suspension upgrade feel worse off-road? Your suspension upgrade may feel worse due to mismatched components, altered suspension geometry, or incorrect shock length for your lift height. These issues can lead to a rougher ride and compromised handling.
Q2. How do I choose the right suspension for rock crawling versus high-speed desert driving? For rock crawling, prioritize articulation with softer settings to absorb jagged impacts. For high-speed desert driving, focus on a suspension that can handle rapid impacts, with more up-travel to maintain ground contact over repetitive bumps.
Q3. What are the key considerations when upgrading suspension for towing versus trail use? Towing-oriented suspensions need enhanced rebound control to manage additional weight, while trail suspensions prioritize flexibility and articulation. Consider your primary use when selecting components to avoid compromising performance in either scenario.
Q4. How can I correct suspension geometry issues after lifting my vehicle? Address geometry changes by upgrading control arms, ensuring proper shock length, and correctly positioning bump stops. Aim for higher caster angles, near-zero camber, and zero total toe to optimize handling and prevent uneven tire wear.
Q5. What are common suspension upgrade mistakes for popular off-road vehicles like the Tacoma and F150? Common mistakes include using universal upgrades without considering vehicle-specific challenges, neglecting rear suspension, and focusing solely on lift height without addressing geometry changes. For best results, choose components tailored to your specific vehicle model and intended use.